The easiest way to create a WordPress backups is by using a plugin like Duplicator. It is one of the best WordPress backup plugins that could be used freely. Even though Pro version is also available for large or enterprise level websites. Duplicator is a beginner-friendly plugin that makes it very easy to back up, migrate, and clone your website. So continue reading to learn How to Backup a WordPress Site With a Plugin (Safest Method).
For this guide, we’ll be using the Duplicator plugin because it includes all the features we need like scheduled backups, recovery points, cloud storage integration, migration tool, and more. The free version is best for getting started.
1. You’ll need to install and activate the Duplicator plugin.
2. You’ll need to head to the Duplicator » Packages page from the WordPress dashboard.

3. From here simply click the ‘Create New’ button in the top corner to backup your WordPress website. The free version will allow you to build full backups or database-only backups by simply checking a box:

4. To customize your backup even more, you can use filters. You’ll be able to filter out file extensions or paths that you don’t want to include in the backup. You can do the same with database tables. We recommend full backup with all option for best result.
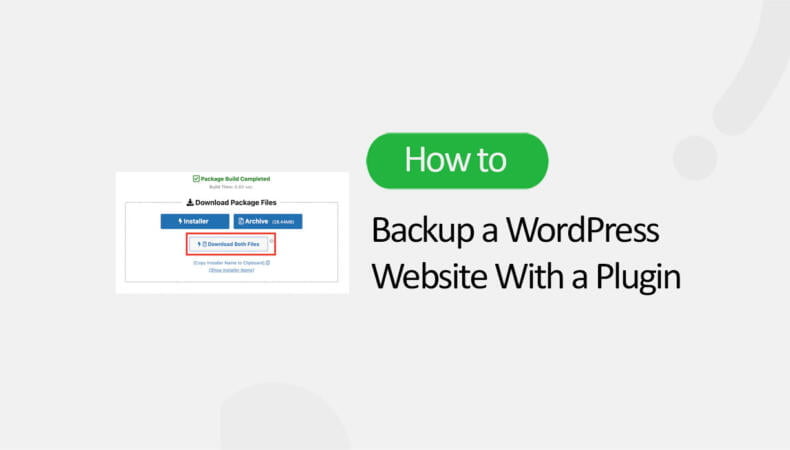
5. Once you build the backup, You can download the archive and installer files. The archive has the full copy of your website, while the installer will help you unpack the archive in the current location or in a new location.

6. In case if you need to use the backup in future of if you are using the backup for cloning or migrating your website then here is how to use it to restore the current version of your website.
7. Upload the the two downloaded files installer.php and archive.zip to the location where you want to restore your website, i.e. public_html which is the root folder of your website.
8. Then, visit https://your-domain.com/installer.php and the Duplicator installer will pop up! This allows you to easily restore your original website.
9. You can use this same process to migrate your website. After creating a complete backup, upload it to a new host, server, or domain name. Duplicator will automatically unpack the archive file, import your database, perform a search and replace, and any other complicated migration tasks!
10. If you do not want the headache of downloading/re-uploading of the achieve and installer files for backup purposes, then you can cut the process by getting a pro version of the plugin. In the pro version, at the step No 5 and after you create the packages, you can easily create a Recovery Point.

In the next window select Set to Recovery Point.

Once done, You can click the recovery arrow icon to copy the recovery URL. You can begin the restore process at anytime by going to the copied link or by launching the recovery process from the Duplicator dashboard.
Automatically Scheduling WordPress Website Backups
With Duplicator Pro, you can also automatically schedule backups for your website. This way, you will always have the latest website backup to work with. Plus, it helps save time as you don’t have to manually create a backup.
To start, you’ll need to go to Duplicator Pro » Schedules from the WordPress dashboard and click the ‘Add New’ button.
After that, you can enter a name for your backup schedule.
The plugin will also let you select a package template, where you get to customize your backup and choose which files to back up. If you want a full backup, then we recommend leaving the package template setting to default.

Next, you can scroll down and select the storage location for your scheduled backups. The plugin will use the default location, but you can add another location, like Dropbox, OneDrive, or Google Drive.
There is also an option to select the frequency of backups. For instance, you can set up automatic backups on an hourly, daily, weekly, or monthly basis. We’ve set the backup repeats to weekly for this tutorial.

After that, you can select a start time for your backup.
You’ll also need to ensure that the ‘Enable This Schedule’ checkbox is selected.

Once that’s done simply click the Save Schedule button.
Duplicator will now automatically back up your WordPress site on the set day and time. This way, you’ll have a fresh backup to restore if anything goes wrong.
Pros:
- Customizable backups
- Cloning to a staging site
- Migrations to a new host, server, or domain name
- Standalone installer to import backups even if WordPress isn’t installed
- Easy backup restores
- Step-by-step migration wizard
- Affordable premium version
- Email notifications with backup summaries
Cons:
- Some backup features like automated backups, cloud storage, and recovery points are limited to the premium version
Conclusion
Duplicator is one of the most used plugins for WordPress backups. With just the free version, you can back up your entire site and migrate it anywhere that supports WordPress. If you upgrade, you can unlock support for WordPress multisite, large sites, developer hooks, and other helpful features.
That’s all for this tutorial. If you want to know how to keep WordPress secure in 2024 go to this link here.
If you have questions, Please feel free to put it in the comments section below
Last modified: January 9, 2024